
Looking to get your golf cart up and running again? If you’re experiencing power loss or trouble starting, it’s possible that your solenoid is the culprit. But don’t worry – there’s a solution! In this article, we’ll show you how to bypass the solenoid on your golf cart, allowing you to temporarily restore power and get back on the green.
Before we dive into the process, it’s important to note that bypassing the solenoid should only be done as a last resort and with caution. It’s always best to test the solenoid first using a voltmeter or multimeter to ensure it truly is the problem. Safety should be your top priority throughout this process.
Now let’s gather our tools and get started. By following these step-by-step instructions, you’ll be able to identify and address any issues with your golf cart’s solenoid in no time.
Let’s get that cart moving again!
Key Takeaways
- Bypassing the solenoid is a temporary solution in emergencies and should only be done as a last resort and with safety precautions.
- Bypassing the solenoid creates a direct path for current using insulated wires and can be used to rule out other problems or get the cart moving temporarily.
- Testing the solenoid requires a voltmeter or multimeter and involves specific steps such as disconnecting cables, setting the cart to neutral, and testing for clicks and ohm readings.
- Ignoring solenoid issues can lead to further problems, and it is important to properly service the golf cart with solenoid issues.
What is a Solenoid?
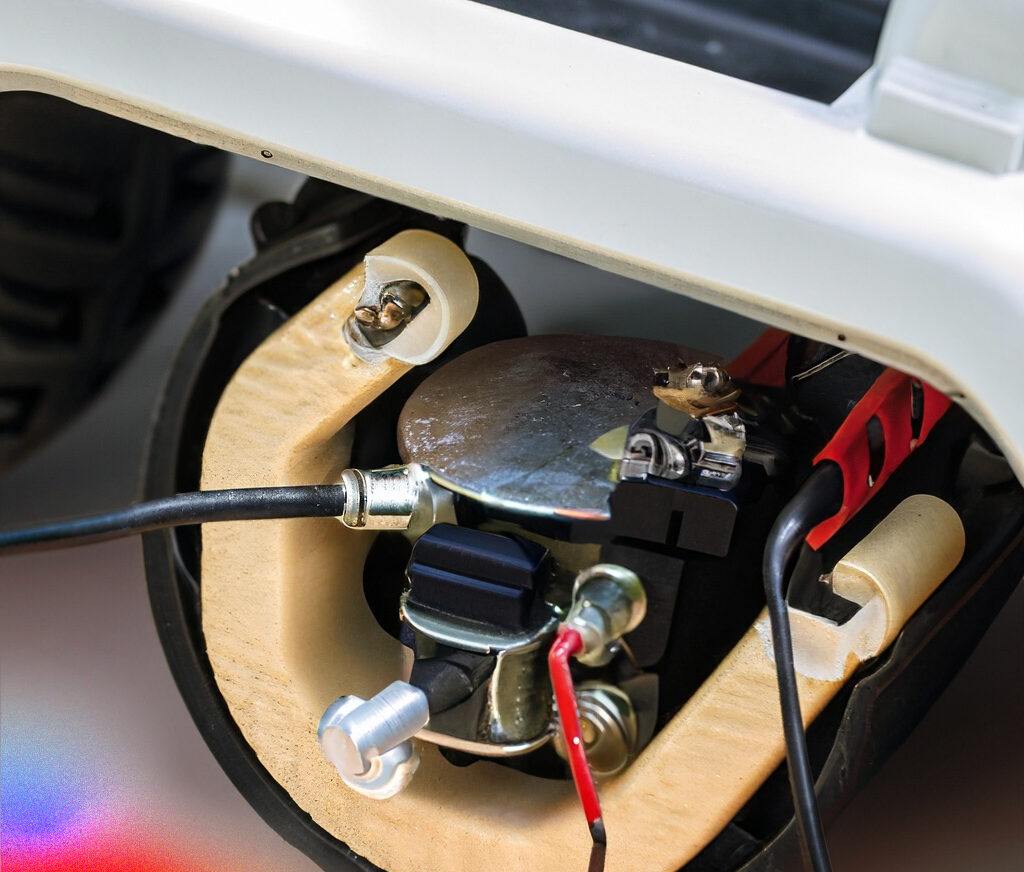
A solenoid is a small yet mighty part of both gas and electric golf carts. Often compared to the human heart, the solenoid is responsible for pumping energy from the battery to the starter or the traction motor. It is made up of two primary parts: a steel plunger and a coil made up of thin wire. As the Go With Garretts Golf Cars & Specialty Vehicles blog explains, every time you start your golf cart or press the pedal, a small voltage jolts the wire coil, triggering the steel plunger to close. This mechanism is what allows energy from the battery to power your golf cart’s motor.
RELATED: How to Add Torque To Golf Cart- [Step-by-Step]
The Role of Solenoids in Golf Carts
How solenoids are used in golf carts and their importance in the electrical system
Solenoids play a crucial role in the operation of golf carts. Essentially, they function as the main electrical switch that connects power from the battery to the traction or pump motor, thus enabling the golf cart to move. If you have driven a golf cart before and wondered what happens when you press the accelerator, you were relying on the functionality of the solenoid. Consistently used during a ride, solenoids are among the golf cart components that commonly need replacement due to wear and tear.
Components of a Golf Cart Solenoid
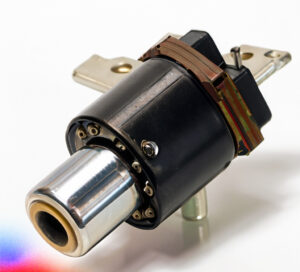
A golf cart solenoid, also referred to as a relay, is a crucial component that contributes significantly to the smooth operation of the cart. This mechanical device consists of several important parts:
- Steel Plunger: It’s the direct connection between the battery and the motor. The primary function of the steel plunger is closing the electrical circuit, allowing energy to flow from the battery to the motor.
- Thin Wire: The wire acts as an intermediary, facilitating the passage of voltage from the battery towards the steel plunger.
- Magnetic Coil: The magnetic coil, or solenoid, becomes an electromagnet when electricity passes through it, subsequently pulling the plunger into the coil and triggering the attached plate against the internal contacts.
Simply put, the primary role of a solenoid in a golf cart is to convert electrical energy into mechanical energy for the operation of the cart. Its functionality is paramount for the repeated start and stop of the golf cart, ensuring it is always ready to hit the greens when you are!
How Does a Solenoid Work in a Golf Cart
Let’s dive into the workings of a solenoid in a golf cart, a key component irrespective of whether the golf cart is gas or electric. The solenoid serves as a relay switch, controlling a high-power circuit with the aid of a low-power circuit.
Step-by-step explanation of the working mechanism of a solenoid in a golf cart
1. Turning on the ignition: When you turn on the ignition key, a small amount of electricity flows to the solenoid.
2. Activating the solenoid: This small amount of current activates the solenoid. In response, the solenoid closes two heavy-duty contacts, allowing a large jolt of electricity to pass through to the starter or the controller and motor in an electric golf cart.
3. Engaging the starter: In a gas golf cart, the solenoid also sends forward a pinion gear, which engages the starter to turn the flywheel over.
4. Retraction and Rest: Once the engine starts, a spring pulls the pinion gear back, preparing it for the next start up. The solenoid returns to an idle state until the next ignition.
Remember, regular check-ups of your solenoid can prevent being stranded in the middle of the course!
Signs of a Bad Solenoid in a Golf Cart
One of the most common signs of a bad solenoid in a golf cart is an inability to start. As golf carts depend heavily on their solenoid to provide power from the battery to the motor, a malfunction in the solenoid leads to a lack of ignition. Specifically, the absence of a click noise when turning on the ignition is often a clear indicator of a faulty solenoid. Being equipped with this knowledge makes troubleshooting much easier if you notice your golf cart behaving inconsistently or not starting at all
RELATED: 5 Reasons Why Your Golf Cart Won’t Start
Identifying the Problem with Your Golf Cart
If your golf cart isn’t starting or making clicking sounds without power, it could be a sign of a bad solenoid. For example, John’s electric golf cart wouldn’t start and had no power, indicating a potential issue with the solenoid.
To identify the problem with your golf cart, you should first familiarize yourself with troubleshooting techniques. Start by checking for common signs of a bad solenoid, such as failure to start or clicking sounds without power. These are clear indications that there may be an issue with the solenoid.
Before proceeding further, it’s important to take safety precautions. Make sure the golf cart is in park or neutral and turn off the ignition before attempting any repairs. Additionally, wear gloves and goggles to protect yourself from any potential hazards.
Once you’ve identified that the solenoid is likely causing the problem, gather the necessary tools for testing and troubleshooting. You’ll need a voltmeter or multimeter to measure voltage and resistance. It’s also helpful to have a wiring diagram specific to your golf cart model for reference.
By following these steps and using the appropriate tools, you can accurately diagnose whether or not your solenoid is functioning properly. This’ll help you determine if further repairs or replacements are necessary.
Safety Issues Before Start Bypassing

Safety is paramount when working with any electrical components, including a damaged solenoid on a golf cart. Here are some essential safety precautions to consider before attempting to bypass or inspect the solenoid:
- Use Proper Support: Before starting any work on the cart, lift the rear wheels off the ground using appropriate support or a jack. This prevents accidental movement of the cart during the inspection.
- Have a Fire Extinguisher: Keep a fire extinguisher nearby. Electrical issues can potentially lead to fires, so having a fire extinguisher on hand is a safety measure in case of emergencies.
- Beware of High-Voltage: Golf carts operate on high-voltage electrical systems. Avoid touching live wires or accidentally shorting the wiring connections to metal objects, as this can cause severe injuries or electric shocks.
- Work in a Well-Ventilated Area: Inspect or bypass the solenoid in a well-ventilated space. Golf cart batteries can produce hydrogen gas, which is highly flammable. Adequate airflow helps disperse any gas buildup and reduces the risk of ignition from sparks or flames.
- Handle Battery Acid Safely: Golf cart batteries contain sulfuric acid, which can cause irritation or burns. Always wear appropriate protective gear, such as gloves and goggles, when working with battery acid to avoid direct contact.
- Disconnect the Battery: Before working on the solenoid or any electrical components, disconnect the battery to eliminate the risk of electric shock and accidental activation.
- Follow Manufacturer’s Guidelines: Consult the golf cart’s user manual or the manufacturer’s safety guidelines for specific precautions and procedures related to solenoid inspection or replacement.
- Seek Professional Help if Unsure: If you are unsure about inspecting or bypassing the solenoid yourself, it is best to seek assistance from a qualified technician or professional.
Gathering the Necessary Tools
Once you’ve gathered all the essential tools, you’ll be ready to dive into this simple yet effective method of getting your golfing companion back on the green in no time. Troubleshooting the solenoid on your golf cart is an important first step in identifying and resolving any issues. However, it’s crucial to keep safety precautions in mind throughout the process.
Before starting any repairs, make sure you have a voltmeter or multimeter on hand to test the voltage of your solenoid. This tool will help you determine if there’s a problem with your solenoid or if it needs replacement. Additionally, ensure you have insulated wires available for emergency bypass purposes.
When testing the voltage, remember to disconnect the battery and set your golf cart to neutral. This will prevent any accidental movement while working on the solenoid. Use the voltmeter or multimeter to check for proper readings on the smaller terminals of the solenoid.
In case of an emergency bypass, always take necessary safety precautions and only attempt repairs that you feel confident in handling. Bypassing the solenoid involves connecting two larger wires directly to create a direct path for current flow.
With these troubleshooting steps completed, we can now move on to disconnecting the battery as part of our solenoid repair process.
Disconnecting the Battery
Before proceeding, it’s crucial to disconnect the battery as part of the process for repairing the solenoid on your golfing companion. Follow these steps to safely disconnect the battery:
- Locate the battery compartment: The battery compartment is usually located under the seat or in the front of the cart.
- Turn off the ignition: Make sure the ignition switch is turned off to prevent any accidental power surges.
- Remove any accessories: If there are any accessories connected to the battery, such as lights or a radio, disconnect them before proceeding.
- Disconnect the negative (-) terminal first: Use a wrench or pliers to loosen and remove the nut on the negative terminal of the battery. Once removed, carefully lift and move away the negative cable from touching any metal parts of the golf cart.
Remember to take safety precautions when working with batteries:
- Wear protective gloves and goggles: This’ll protect you from potential acid spills or electrical shocks.
- Keep sparks and flames away: Batteries produce flammable gases, so make sure there are no open flames or sparks nearby.
- Avoid short circuits: Prevent accidental contact between tools and both terminals of the battery.
- Properly dispose of old batteries: Old batteries should be disposed of at an authorized recycling center.
By following these steps and taking necessary safety precautions, you can ensure a safe disconnection of your golf cart’s battery before moving forward with troubleshooting techniques for your solenoid issue.
Now let’s move on to locating where your solenoid is positioned in your golf cart’s electric system…
RELATED: Why My Golf Cart Is Starting Clicking Noise
Locating the Solenoid
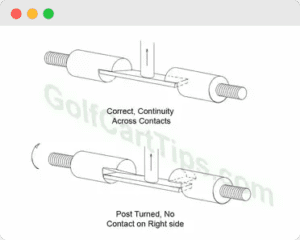
To properly troubleshoot a solenoid issue, it is important to first locate the solenoid within your golf cart’s electric system. Did you know that the majority of golf carts have their solenoids positioned near the battery compartment? This makes it easier to access and test the solenoid for any potential problems. To help you understand the importance of locating the solenoid and performing proper maintenance, let’s take a look at some key information in a table format:
| Testing Methods | Safety Precautions | Troubleshooting Tips |
|---|---|---|
| Use voltmeter or multimeter to check for current flow | Wear gloves and goggles when working with battery acid | Check for loose wiring connections |
| Test for clicks or ohm readings on smaller terminals | Work in a well-ventilated area | Inspect activation circuit for problems |
| Look for needle movement on voltmeter | Have fire extinguisher nearby | Replace faulty contacts or coil if necessary |
Understanding these testing methods, safety precautions, and troubleshooting tips will help you effectively diagnose any issues with your golf cart’s solenoid. By regularly maintaining and checking your solenoid, you can prevent common issues such as failure to start or clicking sounds without power.
Now that you know how to locate and test your golf cart’s solenoid, let’s move on to the next section where we will discuss bypassing the solenoid in case of emergencies.
Bypassing the Solenoid
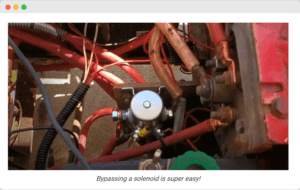
If you ever find yourself in a pinch and need a quick fix for getting your trusty four-wheel ride up and running, there’s a little trick that might just save the day. By bypassing the solenoid on your golf cart, you can temporarily get it moving again. However, keep in mind that this is only a temporary solution and shouldn’t be used as a long-term fix.
Here are three troubleshooting tips to help you bypass the solenoid safely:
- Safety precautions: Before attempting any repairs, make sure to raise the rear wheels off the ground and secure them properly. Have a fire extinguisher nearby and avoid working with high voltage if possible. It’s also important to work in a well-ventilated area and wear gloves and goggles to protect yourself from battery acid.
- Common issues: Bypassing the solenoid is often done when other potential problems have been ruled out. If your golf cart doesn’t start or you hear clicking sounds without power, it could indicate a faulty solenoid.
- Solenoid function: The solenoid acts as a relay switch between the battery/ignition and motor of your golf cart. By bypassing it, you create a direct path for current using insulated wires.
Remember, this is just a temporary solution to get your golf cart moving again. To ensure proper functionality of your cart, testing the solenoid is necessary. Let’s move on to how you can test your golf cart’s solenoid…
Testing Your Golf Cart
Start by checking the functionality of your trusty golf cart with a simple test to ensure everything is working properly. To properly troubleshoot your golf cart, you’ll need to familiarize yourself with some testing techniques and safety precautions. Whether you have a gas or electric cart, using a voltmeter or multimeter will be essential for diagnosing any solenoid issues.
Here’s a helpful table outlining the troubleshooting techniques and common solenoid issues for both gas and electric carts:
| Testing Techniques | Gas Carts | Electric Carts |
|---|---|---|
| Tool Needed | Voltmeter | Voltmeter |
| Step 1 | Disconnect battery cables | Disconnect battery cables |
| Step 2 | Set the cart to neutral | Set the cart to neutral |
| Step 3 | Test for zero ohms and clicking sound | Check for reading on smaller terminals and needle movement on voltmeter |
When testing a gas cart, you’ll want to check for zero ohms and listen for a clicking sound when testing the solenoid. For electric carts, look for readings on smaller terminals and observe needle movement on the voltmeter.
Remember to take appropriate safety precautions throughout this process. Raise the rear wheels off the ground, have a fire extinguisher nearby, avoid high voltage areas, work in a well-ventilated space, and wear gloves and goggles when handling battery acid.
Once you’ve completed these tests, you can move on to reconnecting the battery and performing final checks.
Reconnecting the Battery and Final Checks
After completing the necessary tests, it’s time to reconnect the battery and perform final checks. Reconnecting the battery is a crucial step in troubleshooting your golf cart’s solenoid issues.
Start by ensuring that all cables are properly connected to their respective terminals on the battery. Make sure to tighten them securely to prevent any loose connections.
Once you have reconnected the battery, it’s important to take safety precautions before proceeding further. Ensure that all tools and equipment are safely stored away from the battery and other electrical components. Double-check that you’re working in a well-ventilated area to avoid any potential hazards.
Now, it’s time for final checks. Turn on the ignition switch and listen for any clicking sounds coming from the solenoid. If you hear clicks without power or if there’s no click at all, this indicates a faulty solenoid that may need replacement.
If your golf cart is still experiencing solenoid issues even after reconnecting the battery, there are alternative solutions you can consider. One temporary fix is bypassing the solenoid by directly connecting the two larger wires using insulated wires. However, keep in mind that this should only be done as a last resort and with extreme caution as it may pose safety risks.
Remember, properly servicing your golf cart is essential when dealing with solenoid issues. Regular maintenance and prompt repairs will ensure its optimal performance and longevity.
Frequently Asked Questions
1. Can I drive my golf cart with a bad solenoid?
No, it is not recommended to drive the cart with a faulty solenoid. Instead, focus on replacing the solenoid and exploring troubleshooting options to ensure safety and prevent further damage to the cart’s battery life.
2. What are the potential risks of bypassing the solenoid?
Bypassing the solenoid on a golf cart can pose safety concerns, such as potential electrical issues and impact on battery life. It may also void the warranty and have long-term effects on the cart’s performance.
3. How long can I safely drive my golf cart while bypassing the solenoid?
While bypassing the solenoid on your golf cart may provide a temporary solution, it is not recommended to drive the cart for an extended period. This can negatively affect battery life, speed limitations, overall performance, and the long-term health of the electrical system. Safety precautions should always be followed.
4. Is bypassing the solenoid a permanent solution or just a temporary fix?
Bypassing the solenoid on a golf cart is a temporary fix. Alternatives to bypassing include testing and troubleshooting the solenoid, and replacing it if necessary. Common signs of a faulty solenoid include failure to start and clicking sounds without power. Properly bypassing involves disconnecting cables, setting the cart to neutral, and creating a direct path for current using insulated wires. Regular maintenance is important to avoid solenoid issues.
5. Can bypassing the solenoid cause any damage to other components of the golf cart?
Bypassing the solenoid on a golf cart can potentially cause damage to other components, disrupt electrical safety, and lead to long-term issues. It is best to seek professional advice and explore alternative solutions rather than bypassing the solenoid.
Conclusion
In conclusion, bypassing the solenoid on a golf cart can be a temporary solution to get the cart moving when faced with a faulty solenoid. However, it’s important to note that this should only be done as a last resort and with proper safety precautions in place.
Testing the solenoid using a voltmeter or multimeter is the best way to determine if it’s functioning properly. It’s crucial to address solenoid issues promptly to prevent further problems.
Some may argue that bypassing the solenoid isn’t recommended as it can lead to potential damage or accidents. While this objection holds some validity, when done correctly and temporarily, bypassing the solenoid can help troubleshoot an issue and provide a temporary solution until proper repairs can be made.
Always prioritize safety and follow guidelines when working on your golf cart’s electrical components.
Are Electric Golf Carts More Cost-Effective Than Gas-Powered Ones

I’m Donna Weiss, and I am the proud writer behind the captivating content you’ll find on golfneedy.com. As an avid golfer and passionate writer, I have combined my two greatest passions to bring you an incredible golfing experience. Through my articles, I aim to provide you with valuable insights, equipment reviews, and updates on the latest tournaments. Whether you’re a seasoned golfer or just starting out on this exciting journey, I am here to guide you and share my expertise. Together, let’s explore the fascinating world of golf, uncovering new techniques, and enhancing our skills. Join me on this thrilling adventure as we elevate our game and embark on an exciting golfing journey. Read More