
Hey guys, my name is Donna Weiss and Welome to my golf blog.
As you get ready for a day on the course, you notice that your golf cart’s lights don’t work. A broken fuse is probably to blame if the engine keeps turning over even though everything else is fine.
Thankfully, it’s easy to fix a blown breaker. You can get back to playing golf after reading this blog post. We will show you how to find, identify, and replace a golf cart fuse.
Where are the Fuses on a Golf Cart Located?
For finding the different fuses inside the golf cart, you can use the repair panel that is attached to the golf cart. You can find the service panel on some types of the back bumper, but not all of them. From one model to the next, the exact place of the panel may be different.
That being said, it seems likely that the fuse is what went wrong with the failure. If you are having trouble with the electric start of the cart, for example, you should go to the service room and find the fuse that controls the electric start of the cart.
Here is the list of fuse box chart by Little fuse where you can found all types of fuse.
Note: Make sure the engine of your golf cart is turned off and the key is out of the ignition before you go looking for the fuses.
Here are an easy list of showing the Fuse box’s location with their cart model
| Golf Cart Model | Fuse Box Location |
|---|---|
| EZ-GO 2008 TXT | The inline fuse connected to the key switch |
| EZ-GO 2005 | Below driver’s seat |
| EZ-GO 1990 | In the steering wheel (under a small cover) |
| Yamaha 2014 | The left side of the controller (inside engine compartment) |
| Yamaha G2 | Rear inner fender on the front driver’s side |
| Yamaha G29 | Below cup holder |
| Club Car 1986 | Behind dash |
| Club Car 1997 | Black electrical box by the battery |
| Club Car 2005 | Underneath the seat (in two plastic holders) |
| Club Car 2008+ | Near controller harnesses (some models) |
How Do Fuses Work?
So before we start we should discuss this first – How do fuses works?
Fuses are very important in golf carts because they keep the electrical system from getting too hot. They protect many things, like lights, cigarette lighters, power outlets, fans, horns, and turn signals. When the amount of electricity flowing through lines or parts is higher than what is safe, the fuse melts, stopping the flow and stopping any damage.
Depending on the model, golf carts may have blade-type, glass tube, or tiny fuses. They are usually found in a fuse box near the batteries or under the seat. we will discuss more about it in this article so read till end.
Replace blown fuses with ones of the same type and amperage value every time. Importantly, fuse blowouts that happen more than once a year in the same application usually mean there is an electrical problem deeper down.
This could be anything from loose cable connections to broken solenoids. If a fuse keeps blowing, the cart needs to be repaired by a professional who can find and fix the problem. This will keep the cart safe and prevent damage.
How to Tell the Types of Fuse
To replace blown fuses, you need to know the type of fuse and its amp value. There could be plugs for blades, cartridges, megas, and midis. Pay close attention to the amp number written on the fuse. To make sure you get the right repair, look at a fuse chart.
The Enigma of EzGo Golf Cart Fuse Box Location:
Let’s start our search by looking into where the EzGo golf cart breaker boxes are. Even though EzGo is known for being easy to use, it might still be hard to find the switch box. The 2008 TZXT, for example, has an inner fuse connected to the key switch by a small wire that is cleverly hidden under the engine cover. For safety reasons, the fuse boxes were moved in earlier and later models, like the 1990 and 2005 models, making them a little easier to get to.
Fuse Box Location on Yamaha Golf Carts:
It’s pretty common for Yamaha golf cart types to all have the fuse box in the same place. Yamaha chose to keep the styles the same on purpose. This makes it easier for owners and techs to find the fuse box and use it when they need to.
Let’s look at the 2014 Yamaha golf cart as an example. The fuse box for this type is on the left side of the controller. You will need to open up the engine area of the cart in order to get to it. It’s important to know that this spot is the same for both gas and electric Yamaha golf carts, so the process is the same for all of them.
The fuse boxes are located in different places on different types, though. The fuses for the G2 electric cart are on the rear inner fender, which is on the front of the driver’s side. There is only one model that deviates from the usual location in this way.
Fuse boxes for the G29 type can be found right below the cup holder. Checking or replacing fuses is easy to do thanks to this unique location.
Remember that even though Yamaha’s golf cart models all have fuse boxes in roughly the same place, it’s important to check your owner’s manual or the manufacturer’s instructions for exact information on where the fuse box is located in your model.
Be sure to use the specified fuse. Using a wrong fuse can cause electrical system damage and create a fire hazard. Death or serious personal injury can result from failing to comply with the safety instructions in this manual.
Some Different Models with Fuse Box Locations
Tomberlin Fuse Boxes
According to a post on Cartaholics Golf Cart Forum ,the fuse box for a 2008 Tomberlin Emerge is located under the plastic cover near the solenoid and control box. The post mentions a RO15 10A blown fuse.
Garia Cart Fuse Boxes
According to Garia, there is a fuse box located under the bonnet of the Garia golf cart. The bulletin mentions a mini fuse 14 (30amp) that can be replaced with an external Midi-style fuse to correct a specific concern.
ICON Electric Vehicles Fues Box Location
I found a helpful post on the Buggies Gone Wild Golf Cart Forum that talks about a 12V fuse block for accessories. This fuse block is conveniently located under the cup holders. It’s a neat setup with a 10A fuse already in place. I noticed that there’s also one unused slot in the fuse block, which has been repurposed for lights.
Polaris Golf Cart Fuse box
I came across a valuable post on the Buggies Gone Wild Golf Cart Forum. In this post, the author discusses a practical setup involving a 12V fuse block for accessories cleverly placed under the cup holders. The author notes the presence of a 10A fuse in it and mentions that one of the fuse slots, previously unused, has been repurposed for lights. This setup appears to be a convenient way to manage and add accessories to your golf cart.
Warning Signs That Gold Cart Fuese May be Down/Faulty
It’s important to find power problems early on so that your golf cart stays safe to use. In a golf cart could hurt the battery and lines or even start a fire if you don’t fix them. Someone who knows what to look for can check out and fix any problems right away if you know what they are.
Some key symptoms to watch out for include:
Dimming Headlights
If your headlights dim significantly when you speed up or when the power is being used a lot, it’s probably because the alternator belt is loose or worn. The generator might not be charging the battery right, which is why the headlights dim for a moment when the power goes out. Check your alternator belt and, if necessary, repair or adjust it.
Accessory Operation Problems
If the stereo, lights, or other electrical devices act up or stop working altogether, there may be a problem with the wiring. Look for wire insulation that is worn down or loose, as well as links that are loose or corroded. When there are shorts in the wiring, devices may only work sometimes.
Strange Smells
Write down any strange burning smells that come from electrical parts. This usually means that the wires and insulators are too hot or broken. Stop using the golf cart right away and have an expert look for short circuits.
Frequent Blown Fuses
Fuses help keep the electricity in your golf cart safe. But fuses that keep blowing are a sign of a bigger problem, like a short circuit or power surge. If you change a blown fuse with one that can handle more current, the circuit protection will not work. Get a professional to figure out what the real problem is.
Sparking
If you see sparks coming from plugs, switches, or links, that’s a big. Sparks mean that the wires are live or that there is a broken link. Things close by could catch fire from this electrical spark, so fix it right away.
Hot Wires
By feeling for hot spots in wire harnesses, you can find shorts before they get worse. If any golf cart lines get too hot to touch, that’s a sign that something is wrong.
Flickering Lights
If the lights on your golf cart flicker all over the place, it’s likely that some of the links are loose. It can get worse over time because of noises from moving. Look for connectors on the lines that look like they need to be tightened.
Loss of Power
The power may have gone out while you are driving a golf cart. This could be because of a problem with the wires in the control system. It might not be able to move slowly or quickly. A professional needs to look at lack of power to figure out what’s wrong.
To lower your risks and avoid major damage, keep an eye out for these common signs of an electricity problem. You should talk to a skilled expert if your golf cart keeps having electrical problems. If you fix problems quickly, your cart will stay safe and work well.
Tools Required to Change The Fuse Box Location

Here are some tips for changing a fuse in your golf cart:
- Fuse puller – This is a simple tool that helps you remove and insert fuses without touching the metal contacts. It’s safer and helps prevent damage to the fuse contacts.
- Test light or multimeter – You’ll need this to test the fuse and make sure it’s blown before replacing it. A test light allows you to see if electricity is flowing through the fuse. A multimeter lets you check for continuity.
- Spare fuses – Have the proper replacement fuses on hand for your golf cart before changing any. Check your owner’s manual for the right fuse types and ratings.
- Wrenches – You may need basic wrenches to open the fuse box cover and remove any securing nuts or bolts.
- Gloves – Wearing gloves helps protect your hands from sharp metal edges and electricity.
- Flashlight – Having a flashlight handy makes it easier to see inside the dark fuse box.
- Owner’s manual – Consult the manual for your specific golf cart make and model for fuse box location, fuse diagrams, and any special instructions.
The process involves turning off the golf cart, locating the fuse box, pulling out the bad fuse with the fuse puller, testing the circuit with a test light, inserting the new fuse, and replacing the fuse box cover.
How to Replace a Fuse Box in Any Golf Car- Basic Guide

A blown fuse in your golf cart is a typical occurrence, but replacing a fuse is a reasonably straightforward procedure that you can accomplish with ease. You’ll be able to get your cart up and running again in no time if you follow a few simple procedures and use the appropriate equipment.
Assuming you have already located the fuse box as mentioned earlier, here’s a step-by-step guide to properly replacing a fuse:
- Open the fuse box: Carefully open the fuse box panel to gain access to the fuses inside. Refer to your golf cart’s manual if you’re unsure about the exact procedure.
- Identify the blown fuse: Inspect the fuses inside the fuse box and visually identify the one that has blown. A blown fuse may appear “burned out,” with visible burns on its side. Some fuse boxes may also include a warning icon to indicate a blown fuse.
- Note the voltage level: Take note of the voltage level indicated on the side of the blown fuse. It’s crucial to ensure that you select a replacement fuse with the correct voltage to avoid damaging your cart’s electrical system.
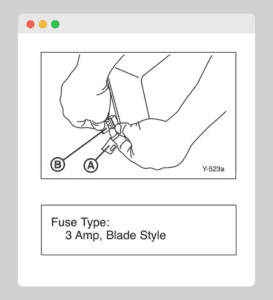
- Remove the blown fuse: Using a pair of needle-nose pliers, carefully pinch the blown fuse and pull it backward. Apply gentle pressure and wiggle the fuse if necessary to loosen its connections. Take care not to damage the fuse connectors in the process.
- Examine the fuse: Once removed, examine the blown fuse once again to confirm the voltage level you need for the replacement. Accuracy is key to ensuring the proper functioning of your cart.
- Purchase a replacement fuse: Purchase a suitable replacement fuse that matches the required voltage level. You can obtain one from a manufacturer or a dealer authorized to sell parts for your specific golf cart brand.
- Double-check the replacement fuse: Before installation, double-check the replacement fuse to ensure it is the correct type and free from any manufacturing defects that may cause harm to your cart.
- Install the replacement fuse: Insert the replacement fuse into the appropriate slot either using your hands or the needle-nose pliers. Make sure the fuse is properly aligned and avoid applying excessive force. You should feel a “click” when the fuse is securely in place.
- Close the panel and test: Close the fuse box panel and test the element of the golf cart that the fuse controls. Drive the cart for 10-20 minutes and monitor if the fuse burns out again. If the cart functions properly without any issues, it’s likely that the replacement fuse is working effectively.
- Seek professional assistance if needed: If the fuse continues to burn out frequently or if you experience repeated issues with your cart’s electronics, it may indicate a deeper underlying problem. In such cases, it is advisable to contact a professional technician or take your golf cart to a manufacturer or retailer for repair.
Safety Concerns While Changing the Fuse Box of Any Golf Cart
Safety should come first when changing the switch box in a golf cart. First, turn off the power source, which generally means taking the battery out of the charger. Use the right tools that are in good shape and wear the right safety gear, like gloves and safety glasses.
Follow the instructions from the maker and label any wires before you disconnect them so you know how to connect them correctly again. When you change fuses, make sure they have the right amperage rating, and while the fuse box is open, check the wires for corrosion or wear. Make sure all the connections are safe, try the system after setting it up, and properly get rid of any old parts.
If you’re not sure about any step or don’t have enough experience, get help from a trained technician or electrician to make sure the fuse box replacement goes smoothly and safely.
Final Thoughts:
Find the switch box in your golf cart can be both a pain and a lot of fun. The electrical system of your golf cart is now safe for you to work on since you know what we’ve learned. Always remember that it’s best to get help from a professional if things get too hard or the flames keep going.

I’m Donna Weiss, and I am the proud writer behind the captivating content you’ll find on golfneedy.com. As an avid golfer and passionate writer, I have combined my two greatest passions to bring you an incredible golfing experience. Through my articles, I aim to provide you with valuable insights, equipment reviews, and updates on the latest tournaments. Whether you’re a seasoned golfer or just starting out on this exciting journey, I am here to guide you and share my expertise. Together, let’s explore the fascinating world of golf, uncovering new techniques, and enhancing our skills. Join me on this thrilling adventure as we elevate our game and embark on an exciting golfing journey. Read More


Pingback: Icon Golf Cart Problems: 10 Common Issues with Solutions
Pingback: 8 Easy Ways To Fix Double Cross in Golf Game