
You’re a golfer, and like most golfers, you have a deep love for your clubs. However, over time, your reliable golf putter has started to show signs of wear and tear. But hold off on rushing to the store to buy a new one just yet; you might be surprised to learn that you can revive your old putter. How? Through refurbishing!
Why refurbishing your golf putter is important
Whether your putter is starting to wear out, or you are looking to enhance your performance for your next game, refurbishing your golf putter can be an excellent choice. A putter is more than just another club; it’s a significant tool that can impact your performance. So, giving it the care it deserves will do wonders for your game. Not to mention, refurbishing is also a cost-effective solution compared to buying a new one.
A step-by-step guide on refurbishing your golf putter
Step 1 – Clean the Putter: Start with a mild, soapy water solution to clean off any dirt and grime. Dry it properly before moving to the next step.
Step 2 – Sand It Down: Use sandpaper to rub down the putter. You’ll want to start with a coarse grit and gradually move to a fine grit.
Step 3 – Refinish: After sanding, it’s time to refinish. Vigorously clean the putter using acetone or nail polish remover before applying a fresh coat of paint.
Step 4 – Re-grip: Remove the existing grip and replace it. You can wrap around a tape before sliding the new grip onto the putter.
Benefits of refurbishing your golf putter
Refurbishing your putter not only revives your beloved club but also offers several other benefits. Reduce Costs: Refurbishing is a penny-saving option compared to buying a new putter. Improve Performance: A refurbished putter can help enhance your performance on the green. Prolong Lifespan: Regular refurbishing can extend the life of your putter, keeping it in peak condition for many more games to come.
However, remember that letting a professional do the refurbishing may ensure a better outcome if you are not confident in your refurbishing skills. Happy golfing!
Tools and Materials Needed
To breathe new life into your used and abused golf putter, you’ll need to gather several tools and materials first. This process isn’t as challenging as you think, and the joy of seeing your favorite golf putter back in pristine condition is well worth the effort.
List of tools and materials required for refurbishing your golf putter
For this rejuvenating activity, you’ll need:
- Grip solvent
- Grip tape
- Space heater or heat gun
- Utility knife or box cutter
- Precision screwdriver
- Vinegar or rust remover
- Wire brush
- Golf grip
- Masking tape
- Dry towel
- Water
- Buffing pad
Explanation of each tool and material and their importance
- Grip Solvent: You’ll use this to lubricate the new grip before sliding it on the shaft.
- Grip Tape: This is essential for ensuring the grip adheres securely to the putter shaft.
- Space Heater or Heat Gun: You’ll need this to loosen the existing grip adhesive.
- Utility Knife or Box Cutter: This tool is crucial for slicing off the old grip.
- Precision Screwdriver: This will help you remove any screws in the putter head.
- Vinegar or Rust Remover: Vinegar or any rust remover is vital to clean off any rust on your putter head.
- Wire Brush: You’ll use this to scrub off rust after applying the vinegar or rust remover.
- Golf Grip: Naturally, you’ll need a new golf grip.
- Masking Tape: Use this to protect parts of the putter you don’t want to get scratched or damaged.
- Dry Towel: Handy to clean up spills and wipe down the putter before you start installing the new grip.
- Water: This is used in combination with the wire brush for a thorough rinsing after rust removal.
- Buffing Pad: A buffing pad is essential for restoring the final shiny finish to your putter.
Having the right tools and materials makes the process of refurbishing your golf putter much easier. With a little patience and time, your golf putter can look – and feel – just like new. Let’s tee up and get started on this rewarding project!
Step-by-Step Guide to Refurbishing Your Golf Putter
Nothing kills the joy of a golf game more than a worn-out putter. If you’re fond of your old buddy but have noticed a decline in performance, it may be time to refurbish your putter. Instead of buying a brand new putter, you can save money and extend the life of your current putter with a bit of elbow grease.
Step 1: Cleaning the putter head
Firstly, you’ll want to clean your putter head thoroughly. Prepare a mixture of warm water and mild soap. Then use a nylon brush to scrub away any dirt or grass stains. Avoid using metal brushes as they can scratch the putter’s surface. Afterward, rinse under warm water and dry it using a clean towel.
Step 2: Removing rust or corrosion
It’s disappointing to find rust and corrosion marring your favorite putter. Don’t worry! Vinegar is an easy solution. Submerge the putter head in white vinegar for about 24 hours. Then, scrub off the rust. If you see deep rust, you might need to repeat this process multiple times until all rust is gone.
Step 3: Polishing the putter head
Next, comes the part that gives your putter its gleaming allure. Use metal polish and a microfiber cloth to carefully polish the putter head. Always follow the grain of the metal when polishing to avoid scratching.
Step 4: Restoring the paint or finish
Small paint brushes and nail polish can help you restore damaged paintwork. You can repair the putter’s finish with the matching nail polish color or use a putter paint filler, available in different colors.
Step 5: Replacing the grip
A new grip can work wonders on the feel of a putter. Simply slide the old one off, apply some golf grip solvent to the new one and slide it on.
Step 6: Reassembling the putter
Now, the final step. Once you’ve replaced the grip, and the paint or finish are dry, it’s time to reassemble your putter. Ensure it is assembled properly to avoid any playability issues on the green.
These easy refurbishing steps will breathe new life into your beloved golf putter and restore its past glory while improving its performance. Keep up with regular maintenance, and your golf putter can be a faithful companion for years.
Tips and Techniques for a Professional Finish
Refurbishing your golf putter can be a fantastic way to breathe new life into your game without making a sizable investment. With a bit of cleaning and a few small enhancements, you can feel like you’ve just gotten a brand-new putter. So let’s roll up our sleeves and dive into the process!
Proper cleaning and maintenance techniques
First and foremost, the importance of proper cleaning cannot get overstated. Start by carefully disassembling your putter and give it a good wipe down to clear away any grime and dirt. Submerge your putter’s head in lukewarm soapy water and scrub it gently using a soft toothbrush. Pay attention to intricate parts where gunk can easily get stuck. Dry it off properly as excess moisture can damage the putter.
Choosing the right paint or finish for your putter
Next is the painting or refinishing part. You’ll want to look for specialized paint or finish designed for golf equipment. Use fine grit sandpaper to remove the previous coat and smooth out any dings or scratches. Be sure to clean your putter after sanding and let it dry before applying the new finish. Follow the manufacturer’s instructions for the best drying time.
Using grip tape or solvent for installing the new grip
Finally, you’ll be installing the new grip. Do remember, the grip is not just a piece of rubber; your swing’s success often lies in it. Start by removing the old grip and the adhesive underneath it. Next, you’ll need to apply the new grip using grip tape and grip solvent.
Applying grip tape: Begin by rolling the grip tape around the shaft where your new grip will be, leaving about a half-inch overhang at the top.
Applying grip solvent: Block the hole at the top of the grip and pour solvent into it. Cover the other opening with your finger and shake the solvent around to cover the entire inside of the grip.
Now, your revamped golf putter is looking fresh and ready for the next game. Happy putting!
And remember, patient handling, the right materials, and a bit of effort go a long way in giving your golf putter a professional finish.
Additional Customization Options
Are you game to inject a bit of personal flair into your favorite golf putter? Well, refurbishing offers a broad range of creative options. From refining the putter head to adorning it with personal engravings, the possibilities are almost endless.
Putter head refinishing options (e.g., matte, satin, mirror finish)
One of the primary ways to rejuvenate your golf putter is by considering different putter head refinishing options. You could opt for a matte finish – it’s smooth and adds a touch of sophistication to your putter. Alternatively, a satin finish is designed to reduce glare, perfect for a sunny day on the golf course. Or, if flashy is your style, a mirror finish provides an ultra-glossy, chrome-like effect that’s sure to turn heads.
Different grip styles and materials available
The grip is an important element of your golf putter, and opting for a refurbish allows you to try different shapes or materials. If you’re after a non-slip grip, investing in a rubber-based style might be right up your alley. Alternatively, you might decide to try a corded grip, known for its firm texture and being weather-resistant, perfect for golfing in wet conditions. Or perhaps something more luxurious – a leather grip, a timeless option associated with golfer’s luxury and comfort.
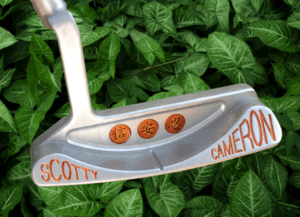
Personalized stamping or engraving
Add a personal touch to your golf putter by opting for personalized stamping or engraving. A name, initials, or a favorite quote can be etched onto the putter. This customization not only enhances aesthetic value but also offers an excellent way for easy identification: imagine never worrying about mix-ups on the golf course again!
Refurbishing is your ticket to a revamped golf putter – one that reflects your personal style, offers enhanced gaming performance, and, importantly, lets you enjoy the sport with a reinvented sense of enthusiasm. With plenty of options available, you can turn your favorite golf putter into an extraordinary and unique golfing tool. Enjoy the bespoke journey!
Care and Maintenance
After breathing new life into your golf putter, it’s essential you take care of that revamped gem. Here are some tips and suggestions to maintain its quality and longevity.
Tips for keeping your refurbished putter in top condition
Don’t Neglect the Grip: Often during refurbishing, many people fixate on the putter’s head, forgetting the grip. Remember to clean and check regularly for wear and tear. Replace if necessary to ensure maximum control and comfort each time you swing.
Dents and Scratches: Your golf putter may accumulate dents and scratches over time. Smoothing these out periodically ensures your newly refurbished putter stays in prime condition. You could use a little oil and a fine steel wool pad for this.
Preventing Rust: Proactively prevent rust by cleaning and drying your golf putter after each use. A thin film of gun oil or WD-40 could help protect it from oxidation.
Regular cleaning and storage advice
Keeping it Clean: Regular cleaning is essential. Depending on your putter materials, you could employ a soft bristle toothbrush alongside a gentle detergent. Remember to dry fully after every clean to prevent rust. Regular cleaning also gives you a great opportunity to spot any developing issues early.
Proper Storage: When storing your refurbished golf putter, a soft, dry case works best. Avoid damp environments or areas with harsh temperature swings, as these might harm your putter. Also, it would be best not to put unnecessary strain on the shaft when securing it in your golf bag.
To summarize, maintaining your refurbished golf putter’s condition is as crucial as the refurbishment process. With a much-deserved new life, your golf putter merits a proper care routine. Through regular cleaning, storing correctly, and actively preventing rust, you ensure your putter’s refurbishment lasts for the long haul.
Remember, in addition to being a practical tool on the green; a well-maintained golf putter speaks volumes about its owner. It highlights your respect for the sport and adds a dash of personal style to your golfing game. So, treat it well, and it will return the favor on the fairway.
Conclusion
Think abundantly about the pride and satisfaction you will feel, knowing you breathed life back into your old golf putter. That age-old tool in your golf kit is not just a piece of equipment; it carries an inventory of cherished memories from your golfing experiences. So why let it lose its shine when you can refurbish it?
The process of refurbishing your golf putter isn’t as arduous as it seems. With some patience and a bit of dedicated time, you can restore your trusted sidekick to its former glory. The result is a golf putter that not only performs like new but is also a testament to your appreciation for quality and sustainability.
Moreover, refurbishing your putter is a green initiative. In a time when everyone is encouraged to recycle, reuse, and reduce, your effort in refurbishing your golf putter is a step towards that direction. This singular act contributes to the sustainability of the environment by reducing waste and conserving resources.
Summary of the benefits of refurbishing your golf putter
- Save Money: Buying a new golf putter is sometimes an unnecessary expense. Especially when you can restore your current one to a spanking new look. Refurbishing can make your putter last longer, saving you the cost of a new purchase.
- Personal Attachment: People grow fond of their belongings, and golf putters are no exception. If you have an emotional connection to your golf putter, refurbishing it allows you to preserve that bond and continue to create more memories with it.
- Environmentally Friendly: Refurbishing you putter not only extends its lifespan but it also reduces the consumption of new raw materials and energy used in manufacturing a new one. It’s a win-win scenario for you and Mother Nature!
Here’s a table summarizing the benefits of refurbishing:
| Benefit | Explanation |
|---|---|
| Save Money | – Refurbishing can extend the lifespan of your golf putter, thus, eliminating the need for an immediate new purchase. |
| Personal Attachment | – By refurbishing your putter, you get to maintain an emotional bond with an item that has served you well in your golfing experiences. |
| Environmentally Friendly | – Refurbishing reduces consumption of new raw materials and energy used in producing new putters. It’s a conscious step towards being eco-friendly. |
With these benefits, refurbishing your old golf putter doesn’t seem like such a bad idea, does it? So why not give your trusty old friend a much-needed facelift today?

I’m Donna Weiss, and I am the proud writer behind the captivating content you’ll find on golfneedy.com. As an avid golfer and passionate writer, I have combined my two greatest passions to bring you an incredible golfing experience. Through my articles, I aim to provide you with valuable insights, equipment reviews, and updates on the latest tournaments. Whether you’re a seasoned golfer or just starting out on this exciting journey, I am here to guide you and share my expertise. Together, let’s explore the fascinating world of golf, uncovering new techniques, and enhancing our skills. Join me on this thrilling adventure as we elevate our game and embark on an exciting golfing journey. Read More