
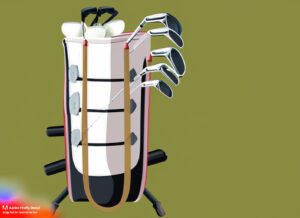
Golf bag tubes are an essential accessory for every golfer. They help keep your clubs organized, prevent them from scratching against each other, and make it easier to access the club you need during your round. While many golf bags come with built-in club dividers, some golfers prefer to customize their bags by making their own tubes. In this blog post, we will explore the importance of golf bag tubes and discuss the benefits of making your own.
The Importance of Golf Bag Tubes
Golf bag tubes play a crucial role in protecting your clubs and keeping them in optimal condition. Here are a few reasons why golf bag tubes are important:
1. Club Protection: Golf bag tubes provide individual compartments for each club, preventing them from banging against each other during transportation or storing. This helps to minimize wear and tear on the clubheads and shafts.
2. Easy Club Retrieval: With golf bag tubes, it is easier to locate and extract the club you need during your round. The tubes keep the clubs separated and organized, allowing for quick access, especially when time is of the essence.
3. Organization and Orderliness: Golf bag tubes help maintain a neat and orderly bag by keeping the clubs in their designated places. This makes it easier to find and replace clubs during your round, reducing the chances of leaving a club behind or misplacing it.
RELATED: Why Golf Is The Hardest Sport
Benefits of Making Your Own
While many golf bags come with club dividers or tubes, some golfers prefer to make their own for a variety of reasons. Here are a few benefits of making your own golf bag tubes:
1. Customization: By making your own golf bag tubes, you have the freedom to customize the size and shape of the tubes to fit your specific needs. This allows you to accommodate clubs of different lengths or use larger tubes for oversized grips.
2. Cost Savings: Making your own golf bag tubes can be a cost-effective option compared to purchasing pre-made tubes or bags with built-in dividers. You can use readily available materials and tailor them to your specifications, saving money in the process.
3. DIY Satisfaction: For those who enjoy do-it-yourself projects, making your own golf bag tubes can be a rewarding experience. It allows you to put your creativity and craftsmanship to work while creating a practical solution for organizing your clubs.
4. Protection: Golf bag tubes provide an extra layer of protection for your clubs, preventing them from getting scratched or damaged during transportation or storage.
5. Organization: Golf bag tubes help you keep your clubs neatly organized, making it easier to find the club you need when out on the course.
6. Customization: Creating your own golf bag tubes allows you to customize them to fit your specific needs. You can choose the materials, dimensions, and designs that work best for you.
7. Cost-Effective: Homemade golf bag tubes are a cost-effective alternative to purchasing pre-made tubes, saving you money in the long run.
In the following sections of this blog post, we will provide step-by-step instructions on how to make your own golf bag tubes, including a list of materials needed and detailed guidance on the construction process. Stay tuned for the next section, where we will dive into the first step of making your own golf bag tubes.
Which Tools and Materials Needed Do You Need?
List of Tools and Materials Required
Before you can start making your own golf bag tubes, you will need to gather the necessary tools and materials. Here is a list of what you will need:
Tools:
- Measuring tape or ruler
- PVC pipe cutter or hacksaw
- Sandpaper or file
- PVC solvent cement or adhesive
Materials:
- PVC Pipes: You will need PVC pipes of various sizes depending on the number of club compartments you want in your golf bag tubes. The standard size for each compartment is 2 inches in diameter, but you can adjust the size according to your preference.
- PVC Elbows and Connectors: These fittings will be used to join the different sections of the PVC pipes and create the compartments for your golf clubs.
- PVC Caps: You will need PVC caps to seal the ends of the PVC pipes and prevent the clubs from falling out.
- PVC Primer and Cement: PVC primer and cement are used to ensure a secure and durable bond between the PVC pipes and fittings.
It’s important to note that PVC pipes and fittings are readily available at most hardware stores. Make sure to select pipes that are sturdy and durable to withstand the weight of your golf clubs.
For detailed information about PVC pipes and their uses, you can refer to the Plumbing article on Wikipedia.
Once you have gathered all the necessary tools and materials, you are ready to move on to the next step – measuring and cutting the PVC pipes to the desired length.
Measuring and Cutting
Determining the Length of the Tubes
Before you start cutting the tubes, you need to determine the length that will best fit your golf bag. Here’s how you can measure and determine the correct length:
- Take your golf bag and place it on a flat surface.
- Measure the height of your golf bag. This will give you an idea of how long the tubes should be in order to provide proper support for your clubs.
- It is recommended to add an extra inch or two to the measured height to ensure that the tubes will fully cover the length of your clubs.
RELATED: How Long Do Golf Gloves Last?
Cutting the Tubes to Size
Once you have determined the length of the tubes, it’s time to cut them to size. Here’s a step-by-step guide on how to do it:
- Using a marker or a pen, mark the determined length on the PVC pipe.
- Use a measuring tape or a ruler to make sure the marks are accurate and evenly spaced.
- Use a saw or a pipe cutter to cut the tubes along the marked lines. Make sure to use smooth and steady strokes to ensure a clean and even cut.
- After cutting the tubes, use sandpaper to smooth out any rough edges or burrs.
- Repeat the measuring and cutting process for each tube that you need for your golf bag.
By following these steps, you will be able to measure and cut the tubes, ensuring that they are the right size and provide the necessary support for your golf clubs.
Remember to always prioritize safety when working with tools and sharp objects. Wear appropriate protective gear, such as gloves and safety glasses, to avoid accidents or injuries.
Sanding and Deburring
Preparing the Edges for Smoothness
To ensure that your golf bag tubes have smooth and polished edges, you will need to sand and deburr them. Follow these steps to achieve the desired results:
- Gather the necessary materials:
- Sandpaper (medium grit)
- Deburring tool or file
- Safety glasses
- Work gloves
- Put on your safety glasses and work gloves to protect your eyes and hands during the sanding and deburring process.
- Start by sanding the edges of the golf bag tubes using medium grit sandpaper. This will help smooth out any rough spots or imperfections. Hold the sandpaper firmly and move it back and forth along the edges in a smooth, steady motion. Be sure to sand all sides evenly to achieve a consistent finish.
- After sanding, inspect the edges of the tubes for any remaining burrs or sharp edges. If you notice any, use a deburring tool or file to remove them. This will ensure that the edges are smooth and safe to handle.
- Take your time and be careful during the sanding and deburring process to avoid causing any damage to the tubes. Remember to maintain a steady pressure and use gentle, controlled movements.
By following these steps, you can achieve professionally finished golf bag tubes with smooth and polished edges. It is essential to take your time and pay attention to detail to ensure the best results.
(Note: Sanding and deburring can be a potentially hazardous activity. It is important to follow safety guidelines and use appropriate protective equipment throughout the process.)
Drilling Holes
To create ventilation holes in the golf bag tubes, follow these step-by-step instructions:
Materials Needed:
– Golf bag tubes- Drill with a small drill bit- Sandpaper
Step 1: Prepare the Tubes
– Take the golf bag tubes and clean them to remove any dirt or debris.- If there are any sharp edges or rough areas, use sandpaper to smooth them out.
Step 2: Determine Hole Placement
– Decide where you want to place the ventilation holes on the tubes.- Consider the area where the clubs will be placed and the optimal airflow needed to keep them dry and prevent moisture buildup.
Step 3: Drill the Holes
– Attach a small drill bit to the drill, ensuring it is appropriate for drilling holes in plastic.- Carefully position the drill bit on the first spot where you want to create a hole.- Apply gentle pressure and slowly drill through the tube.- Repeat this process for each hole, spacing them evenly along the length of the tubes.
Step 4: Smooth the Edges
– After drilling all the holes, use sandpaper to smooth any rough edges or burrs around the holes.- This will ensure that the edges are safe and won’t snag or damage your golf clubs.
By following these steps, you can create ventilation holes in your golf bag tubes to allow proper airflow and keep your clubs dry. Proper ventilation is essential for maintaining the condition of your clubs and preventing any damage that could occur due to moisture buildup.
Remember, it’s important to handle the drill with care and take necessary safety precautions. Always wear protective eyewear and work in a well-ventilated area.
RELATED: Golf Cart Street Driving Laws In California
Assembling the Tubes

Joining the Tubes Together
Once you have successfully created the golf bag tubes, the next step is to assemble them. Here is a step-by-step guide on how to join the tubes together for a sturdy and functional golf bag storage solution.
Step 1: Take one end of a tube and insert it into the open end of another tube. Make sure that the tubes are aligned properly.
Step 2: Apply strong adhesive or PVC cement to the outer surface of the first tube where it will contact the second tube.
Step 3: Push the first tube further into the second tube to ensure a tight fit.
Step 4: Hold the tubes securely together for a few minutes to allow the adhesive or PVC cement to dry and bond the tubes together.
Step 5: Repeat the process for the remaining tubes until all the tubes are joined together to form the desired length of the golf bag storage system.
Step 6: Allow the adhesive or PVC cement to fully cure according to the manufacturer’s instructions before using the assembled tubes.
By following these steps, you can easily assemble the golf bag tubes and create a reliable storage solution for your golf equipment. The joined tubes will provide stability and protection to your golf bags, keeping them organized and easily accessible.
It’s important to note that the strength and durability of the assembled tubes will depend on the quality of the adhesive or PVC cement used. Ensure that you choose a high-quality product that is specifically designed for bonding PVC materials.
Remember to measure and cut the tubes accurately, choose the right adhesive or PVC cement, and follow the step-by-step guide carefully to achieve the best results in creating your own golf bag tube storage system.
Securing the Ends
Methods for Closing Off the Tubes
Once you have constructed your golf bag tubes, it is essential to secure the ends to prevent the golf clubs from sliding out during transportation. Here are a few methods for closing off the tubes and keeping your golf clubs safe:
- Grip Tape: Grip tape is a popular option for securing the ends of the tubes. Simply wrap the grip tape tightly around the top and bottom ends of the tube, creating a firm and non-slip surface. This method provides a secure hold and protects the golf clubs from any movement within the tube. You can find grip tape at most golf equipment stores or online retailers.
- Velcro Straps: Velcro straps are another effective way to close off the ends of the tubes. Attach one side of the Velcro strap to the inside of the tube and the other side to the outside. When transporting your golf clubs, simply fasten the Velcro straps tightly, ensuring a secure closure. This method allows for easy access and removal of the golf clubs when needed.
- Rubber Stoppers: Rubber stoppers or plugs are a simple yet effective option for closing off the ends of the tubes. These stoppers fit snugly into the openings of the tube, providing a tight seal. Rubber stoppers can be found at hardware stores or online, and they come in various sizes to accommodate different tube diameters.
- Duct Tape: Duct tape is a versatile solution that can be used to secure the ends of the tubes. Wrap several layers of duct tape around the top and bottom ends of the tube, ensuring a tight and secure seal. Duct tape is readily available at most hardware stores and is known for its durability and strength.
Remember to choose a method that suits your preferences and provides a secure closure for your golf bag tubes. Properly securing the ends will give you peace of mind knowing that your golf clubs are protected during transportation.
By following these steps and using the recommended methods for closing off the tubes, you can create your own golf bag tubes and ensure the safety of your golf clubs. Happy golfing!
Painting and Customization
Adding Personal Touches to the Tubes
Once you have constructed your golf bag tubes, you may want to personalize them to make them stand out on the golf course. Here are some steps to add your personal touches to the tubes:
- Prepare the Surface: Before painting or customizing the tubes, make sure to clean them thoroughly and remove any dirt, dust, or grease that may be present on the surface. This will ensure that the paint adheres properly and lasts longer.
- Choose Your Design: Decide on the design you want for your golf bag tubes. This could include patterns, colors, or even personal logos or monograms. You can get creative and make it unique to your style.
- Gather Supplies: Purchase the necessary supplies for painting and customization. This may include acrylic paints, paintbrushes, stencils, masking tape, and any other materials you may need.
- Protect the Tubes: If there are any parts of the tubes that you don’t want to paint or customize, use masking tape to cover those areas. This will help create clean lines and prevent paint from getting on unwanted surfaces.
- Painting: Start by applying a base coat of paint on the tubes. This will provide a solid background for your design. Let the base coat dry completely before moving on to the next step.
- Customization: Use stencils, paintbrushes, or other tools to add your desired design to the tubes. Be patient and take your time to ensure accuracy and neatness. You can also use different colors to create depth and visual interest.
- Sealing the Design: Once you are satisfied with the design, apply a clear sealant or varnish to protect the paint and preserve its longevity. This will also give the tubes a polished and finished look.
Remember to let the tubes dry completely before using them. It’s also a good idea to read the manufacturers’ instructions for any specific recommendations on painting and customization.
Adding your personal touches to your golf bag tubes can be a fun and creative way to express your style and make them unique to you. Enjoy the process and showcase your customized tubes on the golf course!
Pros and Cons of Golf Tube Bag
| Pros | Cons |
|---|---|
| Club organization | Increased weight and bulk |
| Club protection | Limited storage capacity |
| Shaft protection | Potential wear and tear over time |
| Easy club insertion and removal | Added cost when purchasing a bag with tubes |
| Enhanced club accessibility | Compatibility issues with oversized grips or putters |
| Durability | Potential difficulty cleaning the tubes |
| Protection against weather | Some designs may not securely hold clubs in place |
Conclusion-how to make golf bag tubes
Creating homemade golf bag tubes can be a fun and rewarding project for any golf enthusiast. Not only are they a cost-effective solution for organizing and protecting your golf clubs, but they can also be customized to fit your specific needs and preferences. By following the step-by-step guide provided in this article, you can easily create your own golf bag tubes that will keep your clubs safe and secure.
Final Tips for Making and Using Them
To ensure the best results when creating and using homemade golf bag tubes, consider the following tips:
1. Choose Durable Materials: Select materials that are strong and durable, such as PVC pipe or pool noodles, to ensure your golf bag tubes can withstand the rigors of transportation and use.
2. Measure Carefully: Take accurate measurements of your golf clubs to ensure the tubes are the correct size. This will provide a snug fit and maximum protection.
3. Label the Tubes: To make it easier to find the right club, consider labeling each tube with the corresponding club type or number.
4. Store Properly: When not in use, store your golf bag tubes in a cool and dry place to keep them in good condition for future use.
By following these tips and guidelines, you can create and utilize homemade golf bag tubes that will enhance your golfing experience. Protect your clubs, stay organized, and enjoy the convenience of having your clubs easily accessible on the course. Happy golfing!
RELATED:
Best Disc Golf Bag With Cooler 2023- Best Quality

I’m Donna Weiss, and I am the proud writer behind the captivating content you’ll find on golfneedy.com. As an avid golfer and passionate writer, I have combined my two greatest passions to bring you an incredible golfing experience. Through my articles, I aim to provide you with valuable insights, equipment reviews, and updates on the latest tournaments. Whether you’re a seasoned golfer or just starting out on this exciting journey, I am here to guide you and share my expertise. Together, let’s explore the fascinating world of golf, uncovering new techniques, and enhancing our skills. Join me on this thrilling adventure as we elevate our game and embark on an exciting golfing journey. Read More